华为云:基于HCE OS的FTP文件共享服务器部署(后端存储对接OBS)

对每个人而言,真正的职责只有一个:找到自我。然后在心中坚守其一生,全心全意,永不停息。所有其它的路都是不完整的,是人的逃避方式,是对大众理想的懦弱回归,是随波逐流,是对内心的恐惧 ——赫尔曼·黑塞《德米安》

写在前面


  • 博文内容为华为云欧拉操作系统入门级开发者认证实验笔记
  • 基于HCE OS的FTP文件共享服务器部署
  • 后端存储对接 OBS
  • 理解不足小伙伴帮忙指正

对每个人而言,真正的职责只有一个:找到自我。然后在心中坚守其一生,全心全意,永不停息。所有其它的路都是不完整的,是人的逃避方式,是对大众理想的懦弱回归,是随波逐流,是对内心的恐惧 ——赫尔曼·黑塞《德米安》


防火墙放行端口

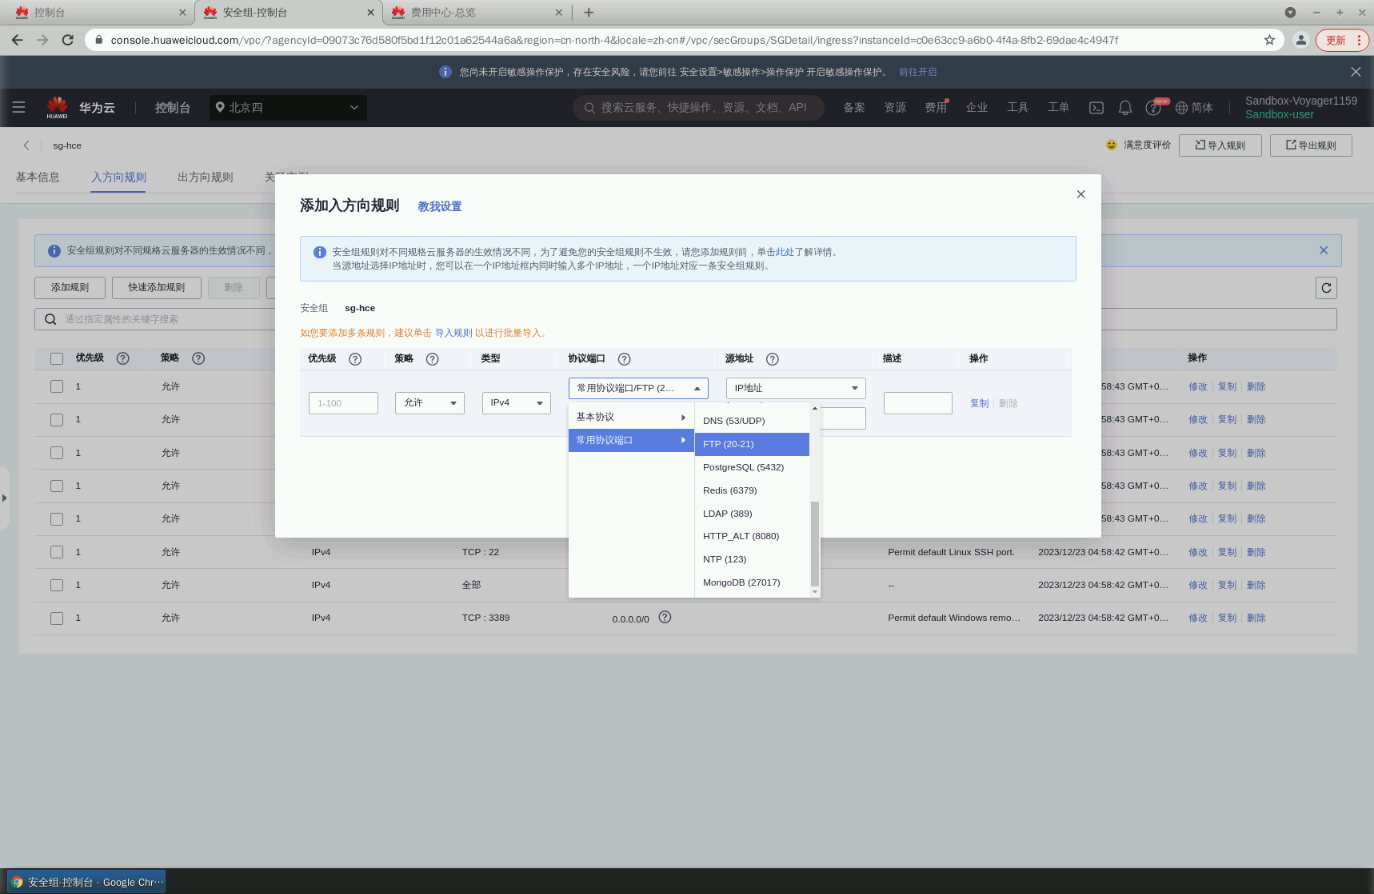
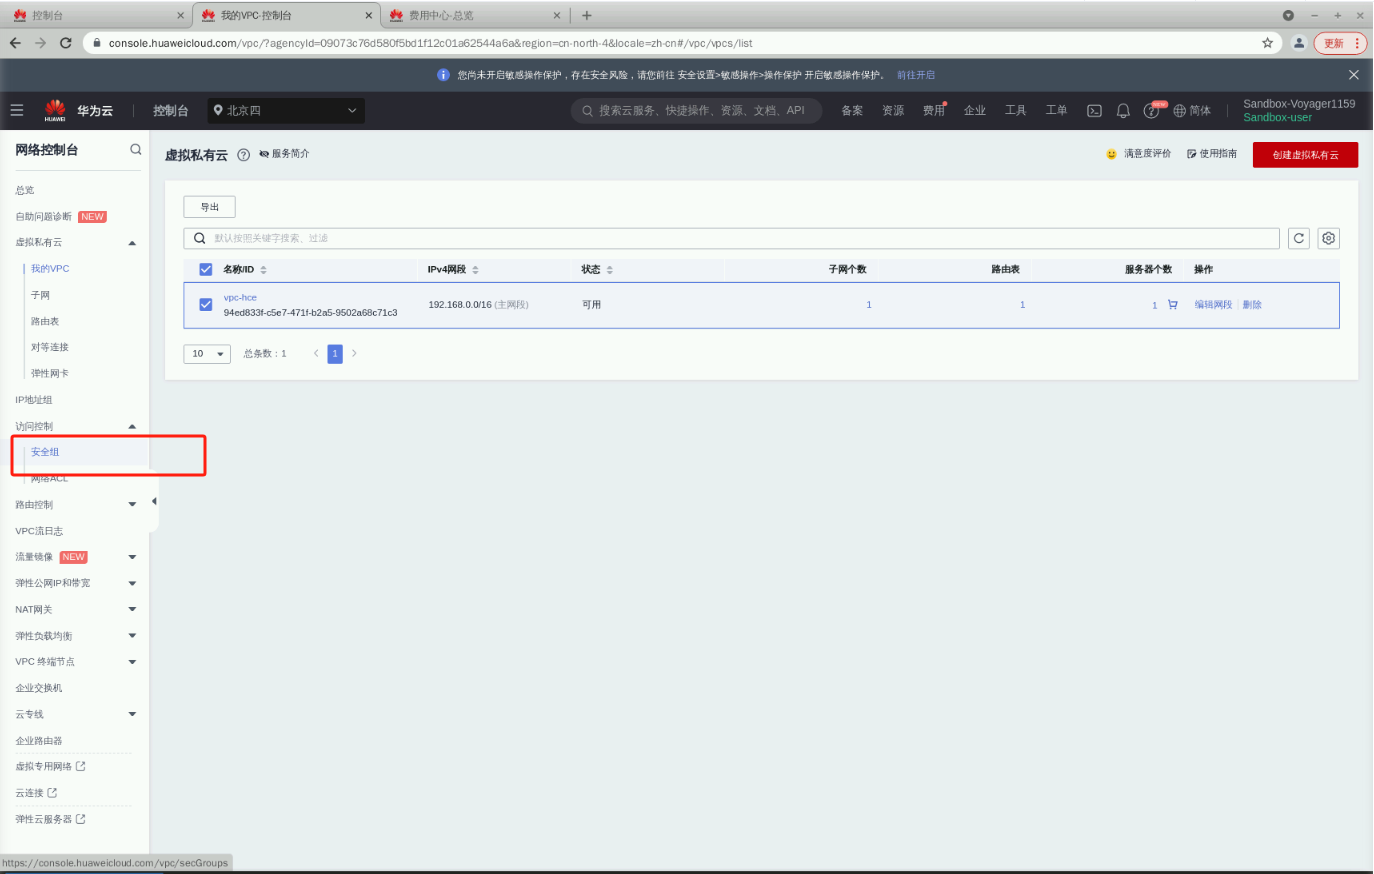
当前假设你已经有了一台弹性云服务器,搭建FTP , 首先需要开启对应的端口,配置安全组, 服务列表>网络>虚拟私有云vpc
在这里插入图片描述

添加入方向 FTP 服务对应的端口

在这里插入图片描述

FTP服务部署

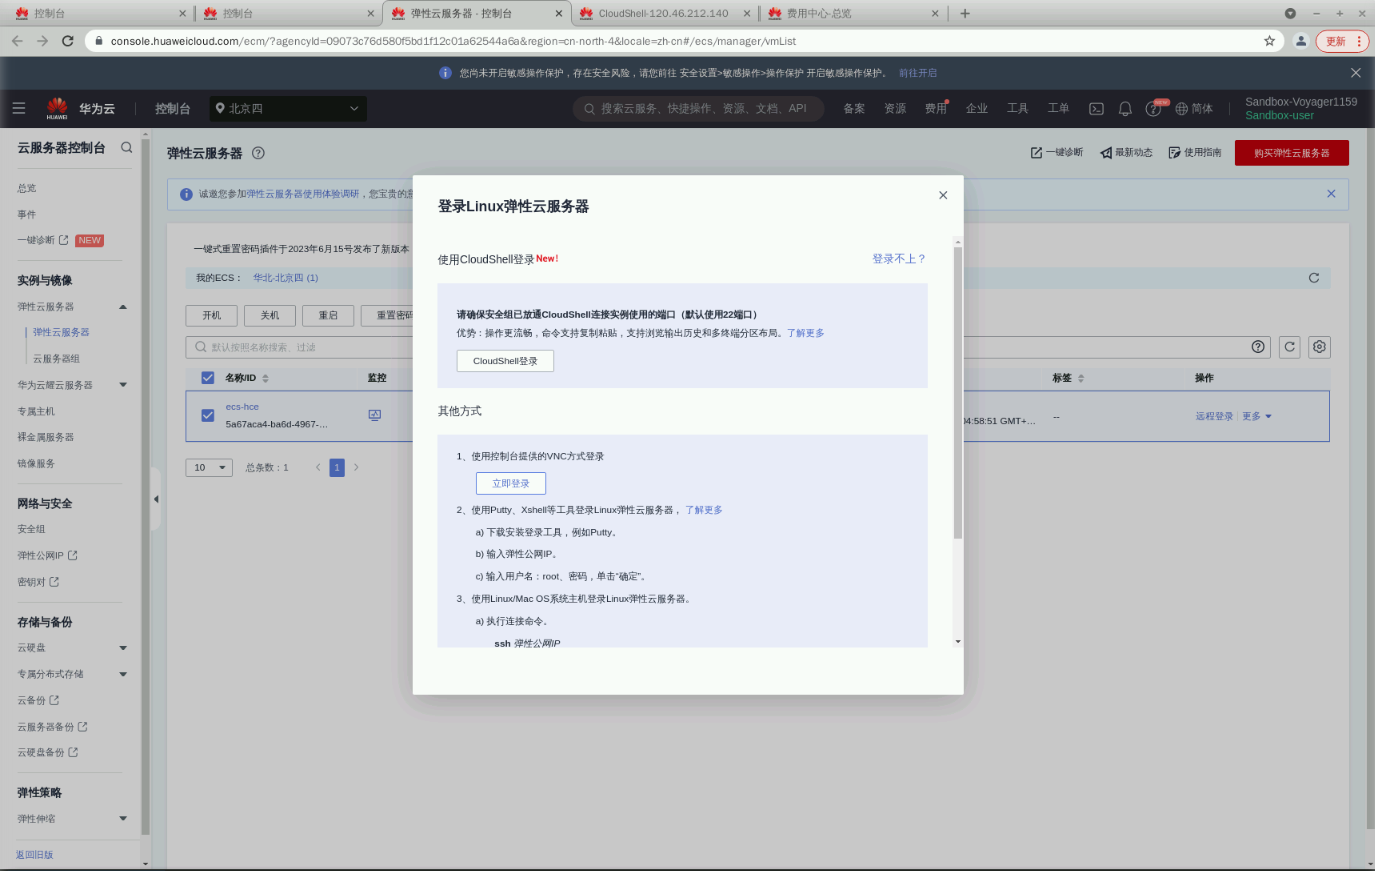
通过cloudshell登录ecs

在这里插入图片描述

当直接通过下面的命令安装ftp服务

1
[root@ecs-hce ~]# yum install -y vsftpd

设置FTP服务开机自启动

1
2
[root@ecs-hce ~]# systemctl enable vsftpd.service
Created symlink /etc/systemd/system/multi-user.target.wants/vsftpd.service → /usr/lib/systemd/system/vsftpd.service.

在ECS上启动FTP服务, 查看FTP服务端口

1
2
3
[root@ecs-hce ~]# systemctl start vsftpd.service
[root@ecs-hce ~]# netstat -nltp|grep vsftpd
tcp6 0 0 :::21 :::* LISTEN 16790/vsftpd

配置vsftpd,查看配置文件位置

1
2
3
4
5
6
[root@ecs-hce ~]# rpm -qc vsftpd
/etc/logrotate.d/vsftpd
/etc/pam.d/vsftpd
/etc/vsftpd/ftpusers
/etc/vsftpd/user_list
/etc/vsftpd/vsftpd.conf

vsftpd安装后默认开启了匿名FTP的功能,使用匿名FTP,用户无需输入用户名密码即可登录FTP服务器,但没有权限修改或上传文件。

用户如果试图使用Linux操作系统中的账号登录服务器,将会被vsftpd拒绝,但可以在vsftpd里配置用户账号和密码登录。

配置登录账号

1
2
3
4
5
6
[root@ecs-hce ~]# useradd ftpadmin
[root@ecs-hce ~]# passwd ftpadmin
Changing password for user ftpadmin.
New password:
Retype new password:
passwd: all authentication tokens updated successfully.

创建供FTP使用的文件目录

1
2
[root@ecs-hce ~]# mkdir /var/ftp/work01
[root@ecs-hce ~]# chown -R ftpadmin:ftpadmin /var/ftp/work01

修改vsftpd.conf 配置文件

1
[root@ecs-hce ~]# vim /etc/vsftpd/vsftpd.conf

默认配置

1
2
3
4
5
6
7
8
9
10
11
12
13
14
15
<https://git.sv.gnu.org/cgit/grep.git/tree/AUTHORS>.
[root@ecs-hce ~]# cat /etc/vsftpd/vsftpd.conf| grep -v ^#
anonymous_enable=NO
local_enable=YES
write_enable=YES
local_umask=022
dirmessage_enable=YES
xferlog_enable=YES
connect_from_port_20=YES
xferlog_std_format=YES
listen=NO
listen_ipv6=YES

pam_service_name=vsftpd
userlist_enable=YES

可根据实际需求选择将FTP配置为主动模式或者被动模式。如果华为云上的服务器需要通过公网IP地址访问华为云上的实例搭建的FTP服务器时,需要将FTP服务器配置为被动模式。(本实验配置为被动模式)

设置以下参数,不允许匿名登录FTP服务器,允许本地用户登录FTP服务器,并指定FTP本地用户使用的文件目录。

1
2
3
anonymous_enable=NO #不允许匿名登录FTP服务器
local_enable=YES #允许本地用户登录FTP服务器
local_root=/var/ftp/work01 #FTP本地用户使用的文件目录

设置以下参数,限制用户只能访问自身的主目录。

1
2
3
4
chroot_local_user=YES #所有用户都被限制在其主目录
chroot_list_enable=YES #启用例外用户名单
chroot_list_file=/etc/vsftpd/chroot_list #例外用户名单
allow_writeable_chroot=YES

设置以下参数,配置FTP支持被动模式。并指定FTP服务器的公网IP地址,以及可供访问的端口范围,端口范围请根据实际环境进行设置。

1
2
3
4
5
listen=YES
listen_ipv6=NO
pasv_address=xx.xx.xx.xx #ECS-hce服务器的公网IP地址
pasv_min_port=3000 #被动模式下的最小端口
pasv_max_port=3001 #被动模式下的最大端口
1
2
3
4
5
6
7
8
9
10
11
12
13
14
15
16
17
18
19
20
21
22
23
24
25
26
27
28
[root@ecs-hce ~]# vim /etc/vsftpd/vsftpd.conf
[root@ecs-hce ~]# cat /etc/vsftpd/vsftpd.conf| grep -v ^#
anonymous_enable=NO
local_enable=YES
local_root=/var/ftp/work01
write_enable=YES
local_umask=022
dirmessage_enable=YES
xferlog_enable=YES
connect_from_port_20=YES
xferlog_std_format=YES
ftpd_banner=Welcome to blah FTP service.
chroot_local_user=YES
chroot_list_enable=YES
chroot_list_file=/etc/vsftpd/chroot_list
listen=YES
listen_ipv6=NO


pam_service_name=vsftpd
userlist_enable=YES


allow_writeable_chroot=YES
pasv_address=120.46.212.140
pasv_min_port=3000
pasv_max_port=3001

chroot_list 文件是限制在主目录下的例外用户名单。如果需要设置某个用户不受只可以访问其主目录的限制,可将对应的用户名写入该文件。如果没有例外也必须要有chroot_list文件,内容可为空。

1
2
[root@ecs-hce ~]# cd /etc/vsftpd/
[root@ecs-hce vsftpd]# touch chroot_list

重启vsftpd服务使配置生效

1
2
[root@ecs-hce vsftpd]# systemctl restart vsftpd.service
[root@ecs-hce vsftpd]#

上面操作涉及到的命令

1
2
3
4
5
6
7
8
9
10
11
12
13
14
15
16
17
18
19
20
21
[root@ecs-hce vsftpd]# history 
1 2023-12-23 13:13:00 root yum install -y vsftpd >> /dev/null
2 2023-12-23 13:14:01 root rpm -qc vsftpd
3 2023-12-23 13:14:11 root systemctl enable vsftpd.service
4 2023-12-23 13:14:16 root systemctl start vsftpd.service
5 2023-12-23 13:14:25 root netstat -nltp|grep vsftpd
6 2023-12-23 13:14:52 root useradd ftpadmin
7 2023-12-23 13:14:53 root passwd ftpadmin
8 2023-12-23 13:15:18 root mkdir /var/ftp/work01
9 2023-12-23 13:15:22 root chown -R ftpadmin:ftpadmin /var/ftp/work01
10 2023-12-23 13:15:27 root vim /etc/vsftpd/vsftpd.conf
11 2023-12-23 13:16:06 root cat /etc/vsftpd/vsftpd.conf| grep -V ^#
12 2023-12-23 13:16:15 root cat /etc/vsftpd/vsftpd.conf| grep -v ^#
13 2023-12-23 13:16:34 root vim /etc/vsftpd/vsftpd.conf
14 2023-12-23 13:22:10 root cat /etc/vsftpd/vsftpd.conf| grep -v ^#
15 2023-12-23 13:22:18 root cd /etc/vsftpd/
16 2023-12-23 13:22:18 root touch chroot_list
17 2023-12-23 13:22:35 root systemctl restart vsftpd.service
18 2023-12-23 13:23:56 root his
19 2023-12-23 13:23:58 root history
[root@ecs-hce vsftpd]#

客户端测试

在linux操作系统中登录。使用以下命令在ecs-hce上安装ftp访问客户端。

1
yum install -y lftp

安装完成之后使用lftp命令登录进入ftp文件服务器,登录过程中需要使用ftpadmin用户名的密码进行鉴权。

1
lftp -u ftpadmin 120.46.212.140  #注意此处的IP地址需要修改为ecs-hce弹性云服务的弹性公网地址

验证登录正常,创建一个目录测试。

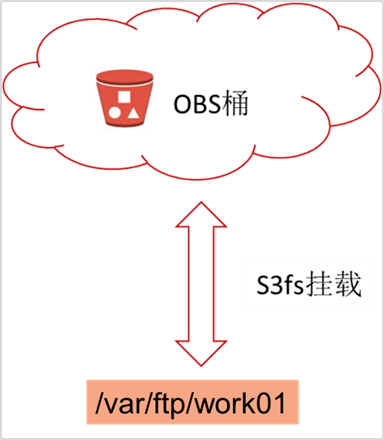
通过上面的方式我们实现了简单的FTP,但是正常情况下,FTP 服务需要大量的存储空间,直接写到 ecs 里面需要考虑扩容等问题,访问也不是特别方便,所以我们需要一个后端存储,可以不用考虑容量,访问方便,即通过下面的方式:
在这里插入图片描述

安装S3FS应用,通过S3FS实现把对象存储Bucket像盘一样,挂在FTP服务的工作目录之下,从而为服务器提供海量的对象存储远程附件存储空间。

创建OBS对象存储

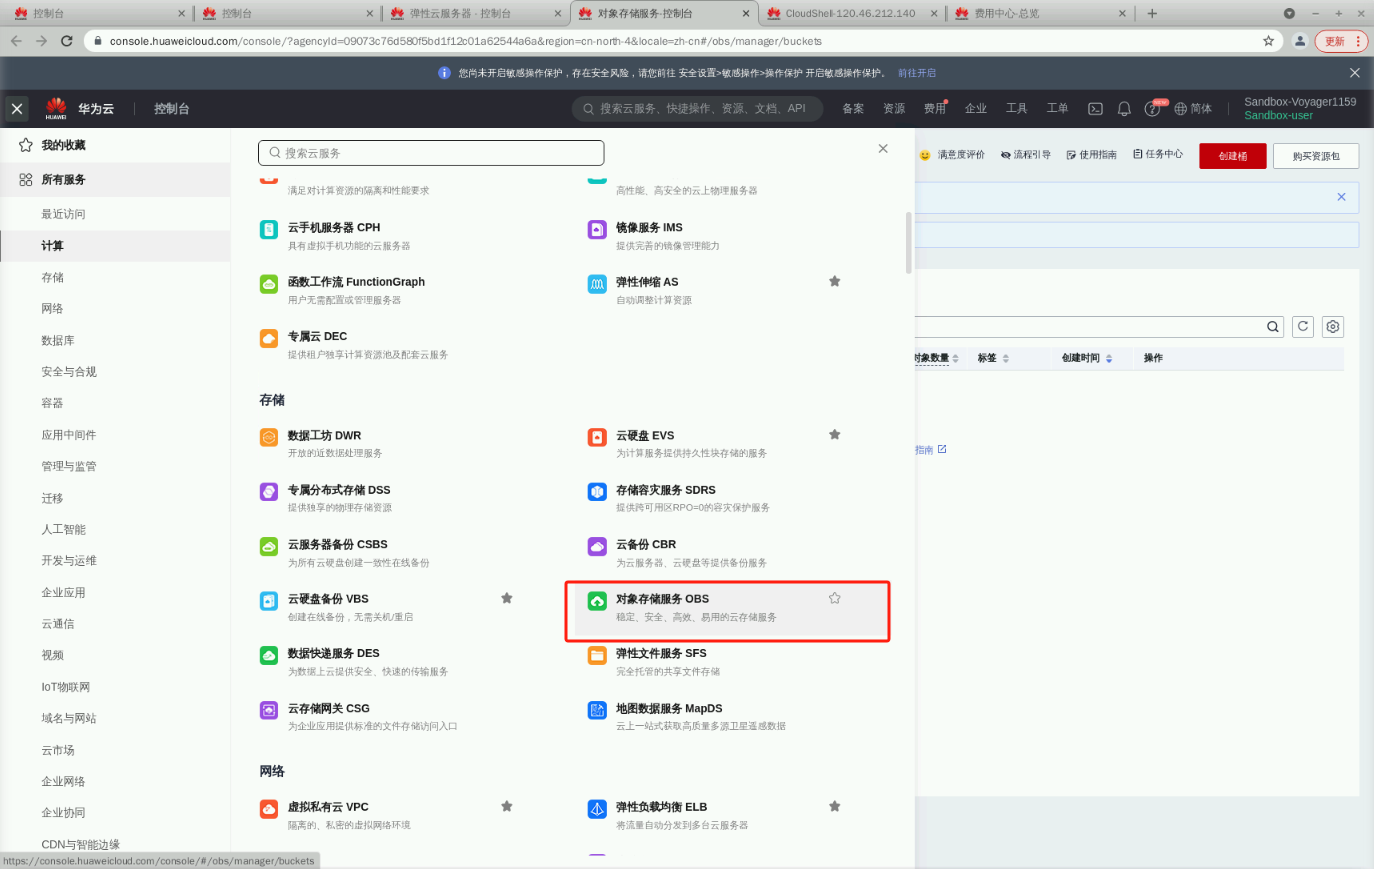
打开OBS服务控制台
在这里插入图片描述

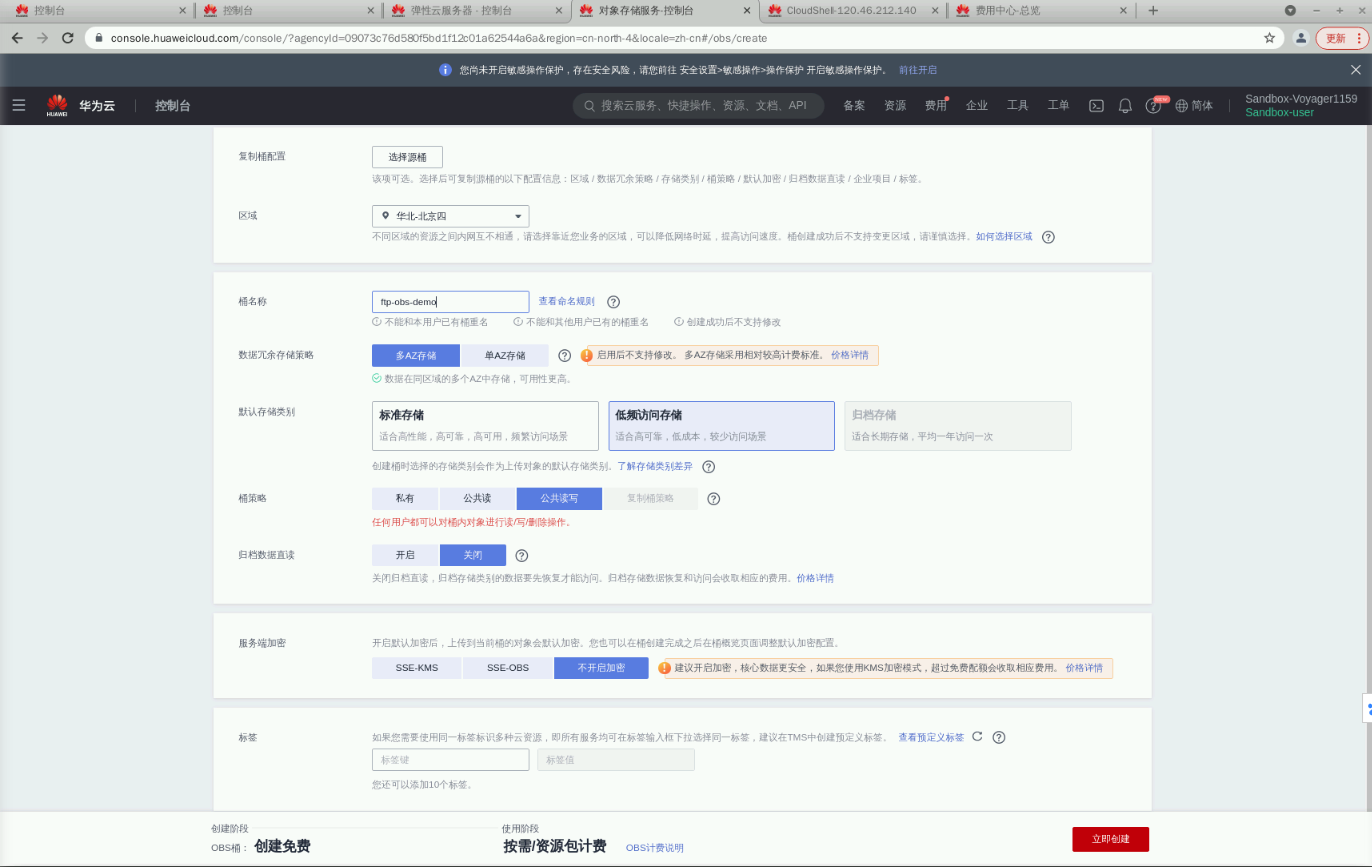
创建存储桶,配置完成之后点击,立即创建。

  • 区域:华北-北京四
  • 桶名称:ftp-obs(如果创建时提示名称已被占用,请自定义名称,并记住该名称)
  • 数据冗余存储策略:单AZ存储
  • 默认存储类别:低频访问存储
  • 桶策略:公共读写(在弹出页签选择“确认修改”)
  • 其他参数:保持默认

在这里插入图片描述

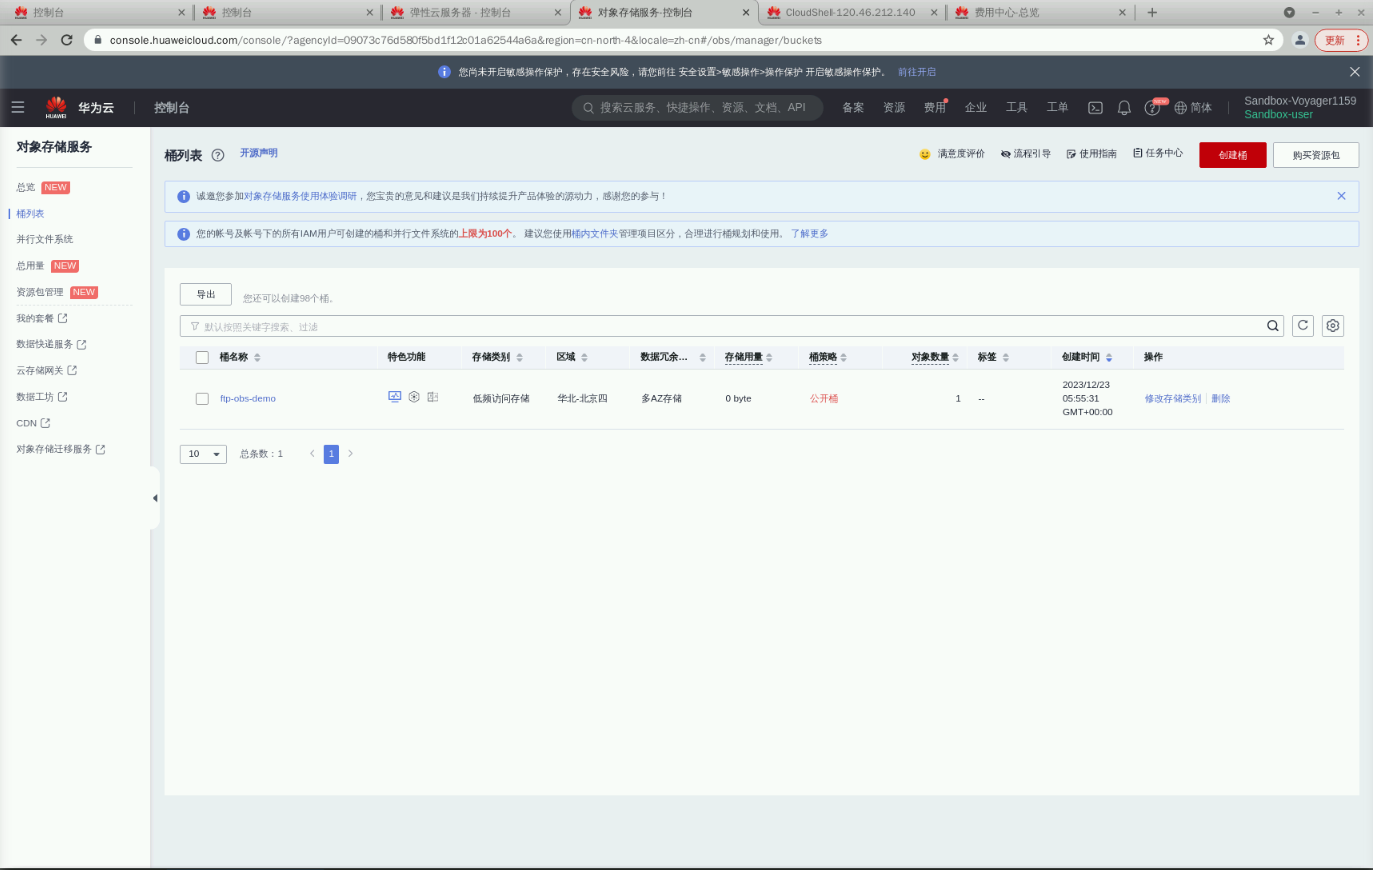
在桶列表中,点击桶名,

在这里插入图片描述

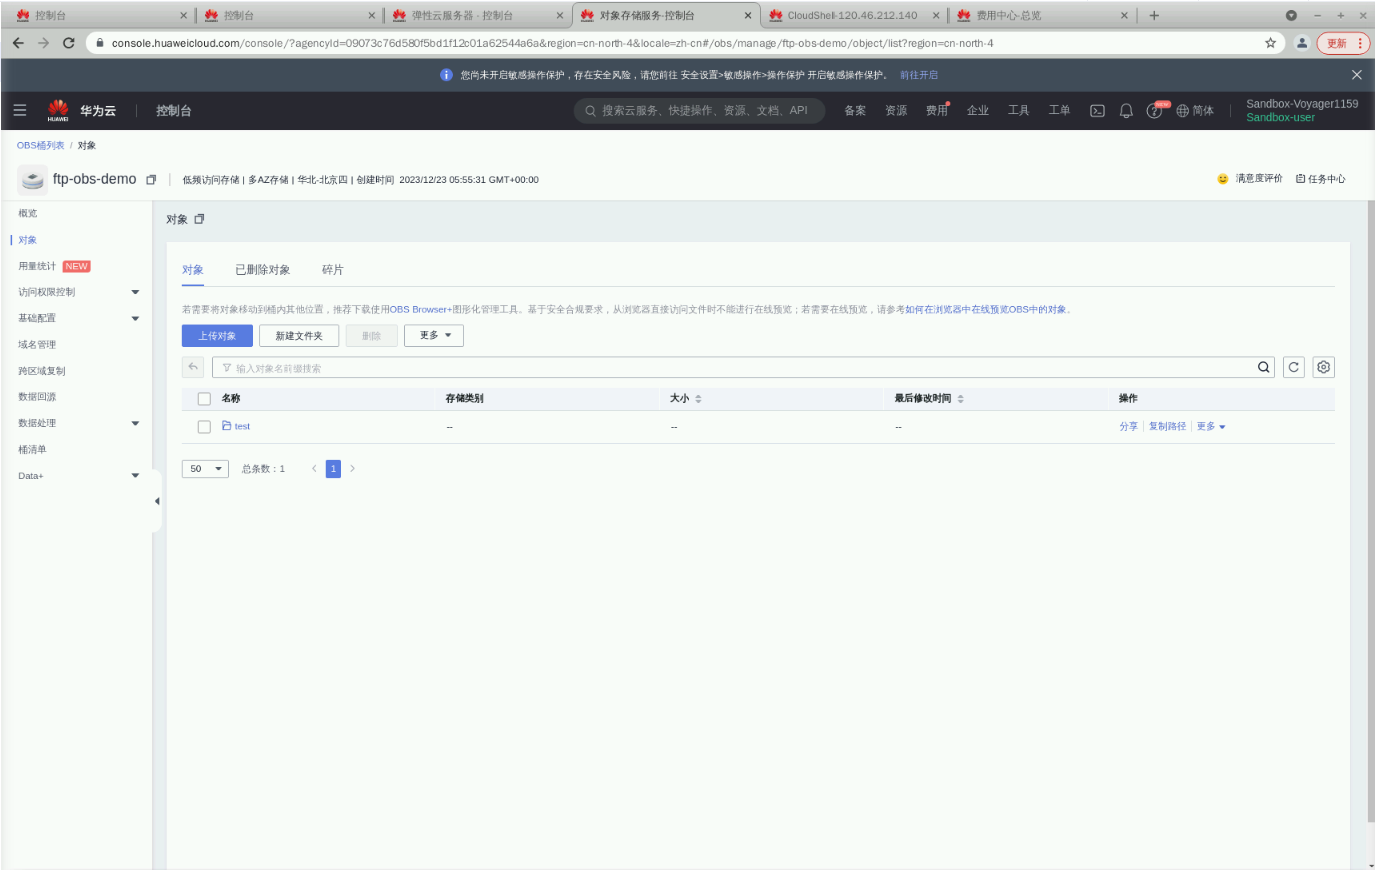
点击对象>新建文件夹。输入文件夹名称,test。点击确定。

在这里插入图片描述

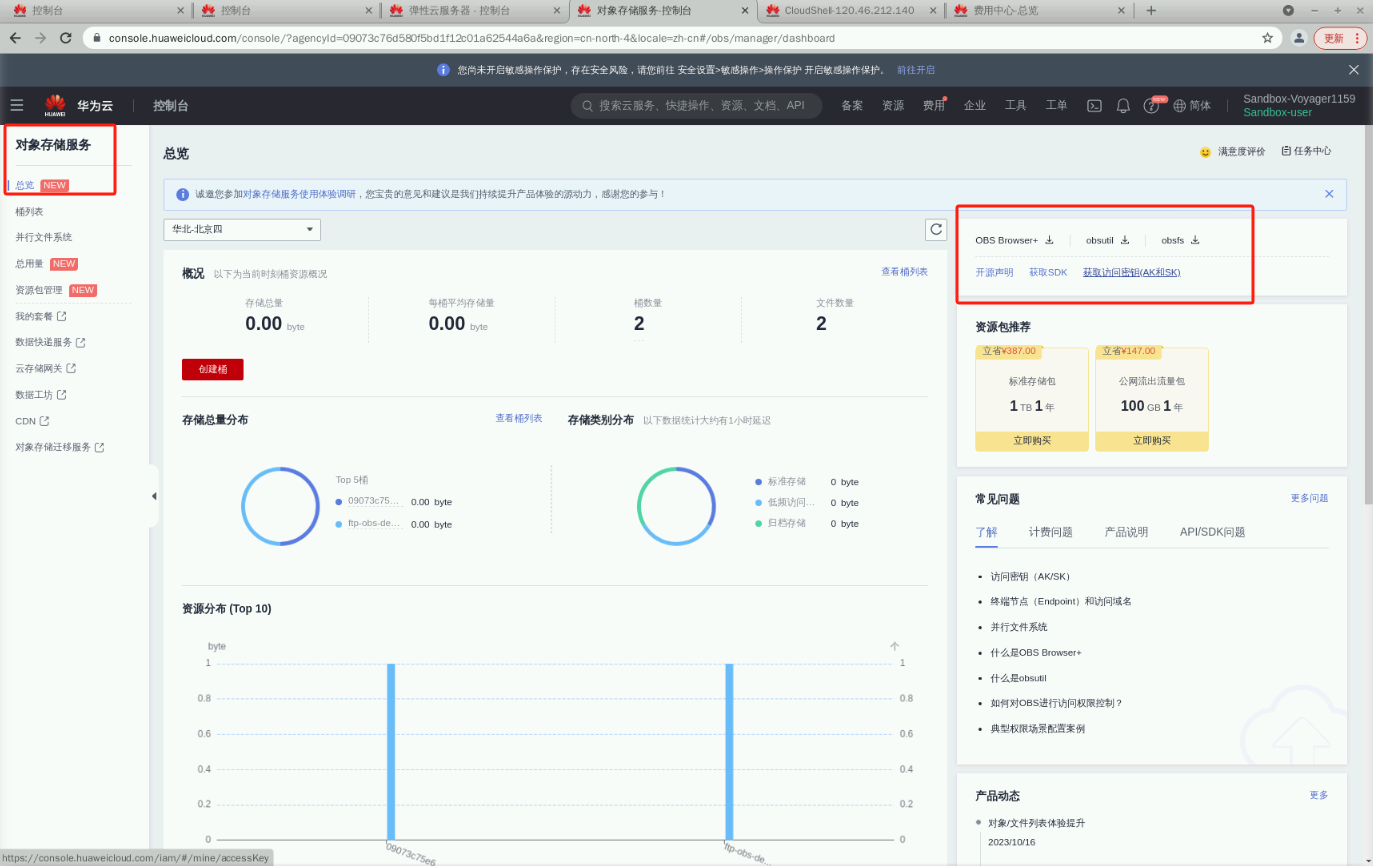
获取访问密钥,打开对象存储服务,点击“总览”。

在这里插入图片描述

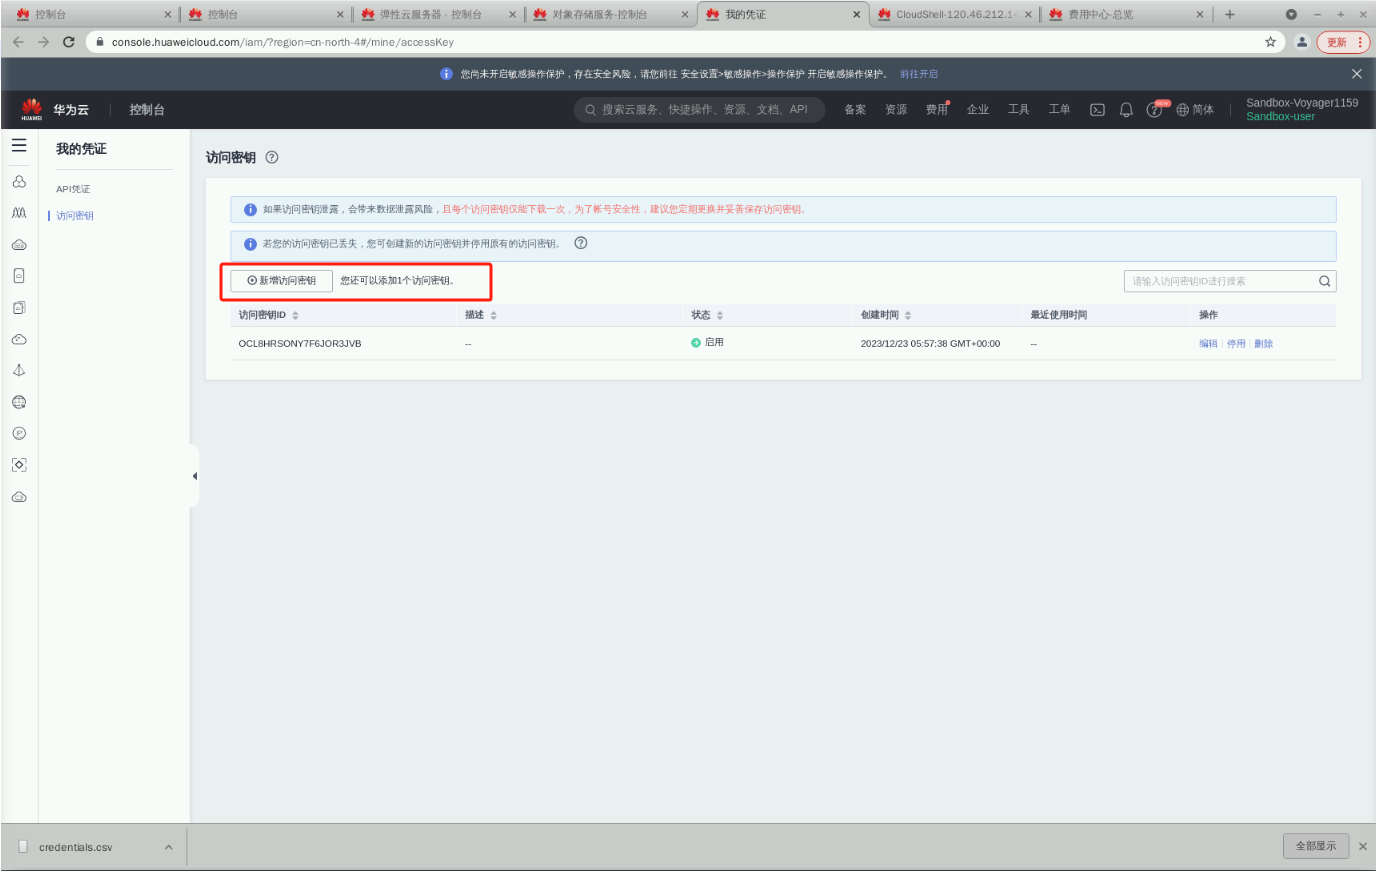
点击“增加访问密钥”,增加后会有一个csv文件自动下载到本地。

在这里插入图片描述

记录下载下来的csv文件中的“Access Key Id”和“Secret Access Key”。

配置OBS挂载至本地FTP

使用root账户登录ecs-hce弹性云服务器, 安装fuse组件(s3fs依赖fuse组件),安装s3fs

直接使用仓库安装

1
sudo yum install -y automake fuse fuse-devel gcc-c++ git libcurl-devel libxml2-devel make openssl-devel

内网环境源码安装

1
2
3
4
5
6
7
8
9
10
11
12
13
[root@ecs-hce ~]# wget https://sandbox-expriment-files.obs.cn-north-1.myhuaweicloud.com/20220329/s3fs-fuse-master.zip
[root@ecs-hce ~]# unzip s3fs-fuse-master.zip
[root@ecs-hce ~]# mv s3fs-fuse-master s3fs-fuse
[root@ecs-hce ~]# ls
s3fs-fuse s3fs-fuse-master.zip
[root@ecs-hce ~]# chmod -R 777 s3fs-fuse/
[root@ecs-hce ~]# cd s3fs-fuse
[root@ecs-hce s3fs-fuse]# ls
AUTHORS autogen.sh ChangeLog COMPILATION.md configure.ac COPYING doc INSTALL Makefile.am README.md src test
[root@ecs-hce s3fs-fuse]# ./autogen.sh
[root@ecs-hce s3fs-fuse]# ./configure
[root@ecs-hce s3fs-fuse]# make
[root@ecs-hce s3fs-fuse]# sudo make install

挂载OBS桶,在/root/下创建.passwd-s3fs的文件,设置文件权限为600

1
2
3
[root@ecs-hce s3fs-fuse]# cd
[root@ecs-hce ~]# touch .passwd-s3fs
[root@ecs-hce ~]# chmod 600 /root/.passwd-s3fs

在.passwd-s3fs的文件中添加OBS桶的AK:SK。此AK,SK内容为“1.3 创建OBS对象存储”步骤4获取的内容。

1
2
3
[root@ecs-hce ~]# cat << EOF >> /root/.passwd-s3fs
> OCL8HRSONY7F6JOR3JVB:IIYEWEEfH9E5U4uTlBBxGB1Ifa2kIS6nSymNnKKa
> EOF
1
2
3
4
5
6
7
8
9
10
11
12
13
14
15
16
17
18
19
20
21
22
23
24
25
26
27
28
29
30
[root@ecs-hce ~]# ls -l /root/.passwd-s3fs
-rw------- 1 root root 62 Dec 23 14:03 /root/.passwd-s3fs
[root@ecs-hce ~]# s3fs -o allow_other ftp-obs:/test /var/ftp/work01/ -o passwd_file=/root/.passwd-s3fs -o url=https://obs.cn-north-4.myhuaweicloud.com/ -o umask=0 -o max_write=131072 -o use_cache=/dev/shm -o big_writes -o enable_noobj_cache -o nonempty
[root@ecs-hce ~]# df -h
Filesystem Size Used Avail Use% Mounted on
devtmpfs 4.0M 0 4.0M 0% /dev
tmpfs 1.7G 0 1.7G 0% /dev/shm
tmpfs 1.7G 17M 1.7G 1% /run
tmpfs 4.0M 0 4.0M 0% /sys/fs/cgroup
/dev/vda1 40G 2.5G 35G 7% /
tmpfs 1.7G 0 1.7G 0% /tmp
[root@ecs-hce ~]# df -h
Filesystem Size Used Avail Use% Mounted on
devtmpfs 4.0M 0 4.0M 0% /dev
tmpfs 1.7G 0 1.7G 0% /dev/shm
tmpfs 1.7G 25M 1.7G 2% /run
tmpfs 4.0M 0 4.0M 0% /sys/fs/cgroup
/dev/vda1 40G 2.5G 35G 7% /
tmpfs 1.7G 0 1.7G 0% /tmp
[root@ecs-hce ~]# s3fs -o allow_other ftp-obs:/test /var/ftp/work01/ -o passwd_file=/root/.passwd-s3fs -o url=https://obs.cn-north-4.myhuaweicloud.com/ -o umask=0 -o max_write=131072 -o use_cache=/dev/shm -o big_writes -o enable_noobj_cache -o nonempty
[root@ecs-hce ~]# s3fs -o allow_other ftp-obs-demo:/test /var/ftp/work01/ -o passwd_file=/root/.passwd-s3fs -o url=https://obs.cn-north-4.myhuaweicloud.com/ -o umask=0 -o max_write=131072 -o use_cache=/dev/shm -o big_writes -o enable_noobj_cache -o nonempty
[root@ecs-hce ~]# df -hFilesystem Size Used Avail Use% Mounted on
devtmpfs 4.0M 0 4.0M 0% /dev
tmpfs 1.7G 0 1.7G 0% /dev/shm
tmpfs 1.7G 25M 1.7G 2% /run
tmpfs 4.0M 0 4.0M 0% /sys/fs/cgroup
/dev/vda1 40G 2.5G 35G 7% /
tmpfs 1.7G 0 1.7G 0% /tmp
s3fs 16E 0 16E 0% /var/ftp/work01
[root@ecs-hce ~]#

在这里插入图片描述

1
2
3
4
5
6
[root@ecs-hce s3fs-fuse]# cd
[root@ecs-hce ~]# touch .passwd-s3fs
[root@ecs-hce ~]# chmod 600 /root/.passwd-s3fs
[root@ecs-hce ~]# cat << EOF >> /root/.passwd-s3fs
> OCL8HRSONY7F6JOR3JVB:IIYEWEEfH9E5U4uTlBBxGB1Ifa2kIS6nSymNnKKa
> EOF
1
2
[root@ecs-hce ~]# ls -l /root/.passwd-s3fs
-rw------- 1 root root 62 Dec 23 14:03 /root/.passwd-s3fs

执行如下格式命令实施 mount(以下示例中,桶名为ftp-obs:/test,test为桶内的指定目录,挂载点为/var/ftp/work01/,在实际使用时,桶名,挂载点,以及url需根据实际情况修改)

1
2
3
4
5
6
7
8
9
[root@ecs-hce ~]# s3fs -o allow_other ftp-obs-demo:/test /var/ftp/work01/ -o passwd_file=/root/.passwd-s3fs -o url=https://obs.cn-north-4.myhuaweicloud.com/ -o umask=0 -o max_write=131072 -o use_cache=/dev/shm -o big_writes -o enable_noobj_cache -o nonempty
[root@ecs-hce ~]# df -hFilesystem Size Used Avail Use% Mounted on
devtmpfs 4.0M 0 4.0M 0% /dev
tmpfs 1.7G 0 1.7G 0% /dev/shm
tmpfs 1.7G 25M 1.7G 2% /run
tmpfs 4.0M 0 4.0M 0% /sys/fs/cgroup
/dev/vda1 40G 2.5G 35G 7% /
tmpfs 1.7G 0 1.7G 0% /tmp
s3fs 16E 0 16E 0% /var/ftp/work01

查看是否挂载成功。

1
2
3
4
5
6
7
8
9
10
[root@ecs-hce ~]# df -h
Filesystem Size Used Avail Use% Mounted on
devtmpfs 4.0M 0 4.0M 0% /dev
tmpfs 1.7G 0 1.7G 0% /dev/shm
tmpfs 1.7G 25M 1.7G 2% /run
tmpfs 4.0M 0 4.0M 0% /sys/fs/cgroup
/dev/vda1 40G 2.5G 35G 7% /
tmpfs 1.7G 0 1.7G 0% /tmp
s3fs 16E 0 16E 0% /var/ftp/work01
[root@ecs-hce ~]# mount -a

卸载已挂载目录的方式为:unmount –l /var/ftp/work01/

1
2
3
[root@ecs-hce ~]# mount -l
........................
s3fs on /var/ftp/work01 type fuse.s3fs (rw,nosuid,nodev,relatime,user_id=0,group_id=0,allow_other)

设置开机启动

为确保客户端重启后,仍可自动挂载OBS桶至本地目录,需在/etc/fstab中新增一行s3fs的开机启动的挂载命令。

其中ftp-obs为示例的桶名,test指桶内的指定目录,/var/ftp/work01/为示例的挂载路径,http://obs.cn-east-3.myhuaweicloud.com/为示例的url,实际配置时,需根据实际情况修改。

1
2
3
4
[root@ecs-hce ~]# cat  /etc/fstab > /etc/fstab.bak
[root@ecs-hce ~]# cat << BOF >>/etc/fstab
s3fs#ftp-obs-demo:/test /var/ftp/work01/ fuse _netdev,allow_other,umask=0,use_cache=/dev/shm,max_write=131072,big_writes,enable_noobj_cache,sigv2,del_cache, url=https:// obs.cn-north-4.myhuaweicloud.com/
BOF

确认配置

1
2
3
4
5
6
7
8
9
10
11
12
13
14
15
[root@ecs-hce ~]# cat /etc/fstab

#
# /etc/fstab
# Created by anaconda on Tue Jun 6 09:04:02 2023
#
# Accessible filesystems, by reference, are maintained under '/dev/disk/'.
# See man pages fstab(5), findfs(8), mount(8) and/or blkid(8) for more info.
#
# After editing this file, run 'systemctl daemon-reload' to update systemd
# units generated from this file.
#
UUID=bb9f8e28-4582-48d5-9fe8-d76d32466d03 / ext4 defaults 1 1
s3fs#ftp-obs-demo:/test /var/ftp/work01/ fuse _netdev,allow_other,umask=0,use_cache=/dev/shm,max_write=131072,big_writes,enable_noobj_cache,sigv2,del_cache, url=https:// obs.cn-north-4.myhuaweicloud.com/

验证结果

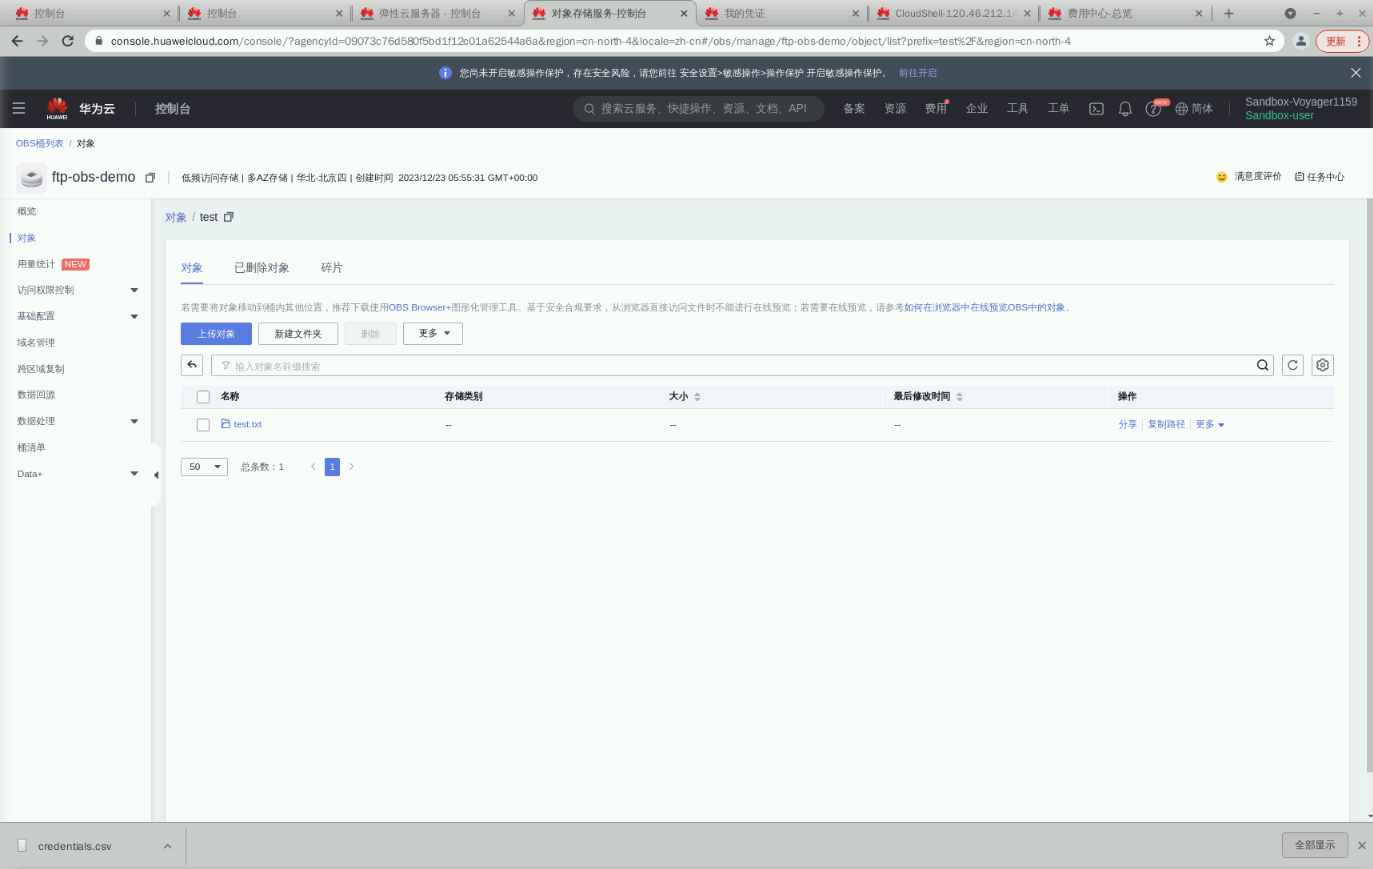
此时再次使用ftp访问工具登录到之前创建的ftp服务器中。并创建文件夹test.txt。(替换为自己的弹性云服务器IP)

1
2
3
4
5
6
7
8
9
[root@ecs-hce ~]# lftp -u ftpadmin 120.46.212.140
Password:
lftp ftpadmin@120.46.212.140:~> mkdir test.txt
mkdir ok, `test.txt' created
lftp ftpadmin@120.46.212.140:/> ls
`ls' at 0 [Making data connection...]

Interrupt
lftp ftpadmin@120.46.212.140:/>

博文部分内容参考

© 文中涉及参考链接内容版权归原作者所有,如有侵权请告知,这是一个开源项目,如果你认可它,不要吝啬星星哦 :)


华为云欧拉操作系统入门级开发者认证: https://edu.huaweicloud.com/certificationindex/developer/9bf91efb086a448ab4331a2f53a4d3a1


© 2018-2023 liruilonger@gmail.com, All rights reserved. 保持署名-非商用-相同方式共享(CC BY-NC-SA 4.0)

华为云:基于HCE OS的FTP文件共享服务器部署(后端存储对接OBS)

https://liruilongs.github.io/2024/01/30/华为云/华为云:基于HCE OS的FTP文件共享服务器部署/

发布于

2024-01-30

更新于

2024-02-15

许可协议

评论
Your browser is out-of-date!

Update your browser to view this website correctly.&npsb;Update my browser now

×